Showing posts with label holiday. Show all posts

Tuesday, April 12, 2011

Boys Easter Shirt

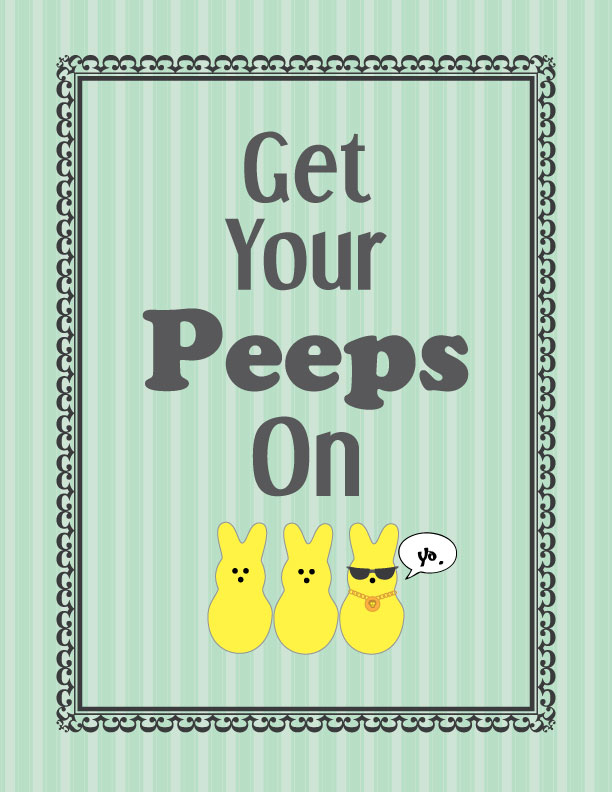
My blogging buddy Bev from Flamingo Toes and I were talking about her printables she makes.  Well, for Christmas she made a get your swag on Christmas print.  It was a funny print inspired by, of all things, a rap song.  Hee Hee.  I thought it was funny.  I told her she she have a Get your swag on inspired peep print. 

And she did!!
Bwhahahah don't you LOVE it!?!!?!

Go here to print it in either green, blue, pink, purple OR like I did and no background.

What?! No background?  Boooo.  Boring!  No wait! 

You print it on fabric...{I got mine from Joann's - with a coupon of course.  It's so easy.  Just print and iron.  And it's washable!}

And after your done printing...iron it on a shirt.

Then hold your child hostage and tell him he can NOT go play at his friends until you get 1 picture of him...hence...the happy face. lol

But Josh wore the shirt to school the other day and everyone loved it!! So THANKS BEV!!!!!! :)

P.S. Today is her blog birthday!  And instead of getting presents she's giving some away!  Hurry go enter!!!

Tuesday, January 18, 2011

More Quick Easy and Cheap Valentine's Decorations

Alright here are just a few more things I've got around the house.
I got these candle holders for free from a girl I knew.  So I threw on some mod podge and rolled them in glitter.  Threw some left over red hots in the bowl and there they sit.  The candle holders are holding some Glade candles.
Cost: free

Please ignore the fact that I need another box of candy thrown in there!  Vase - Goodwill $1.  Flowers $3 (that I bought last week and are still looking good!!) Candy: $4 (it will take 4 boxes...not 3 I guessed) at Dollar Tree.  Jar in the middle - Free recycled

I can't decide if I'm going to keep the red....or put candy hears in next time.  Because next to the flowers I have this candle
Junky picture.  Sorry but it looks totally cool.  I just hot glued candy hearts all the way around a pillar candle.  And I love it!!!

So what decorations do you have up in your house?

Tuesday, January 11, 2011

Some Valentine's Day Inspiration

Here are a few Valentine's Day projects you can make.  Super quick.  And super cheap. 

First the banner.  It's hung on a pretty red string with little clothes pins ($2.39 @ Joann's).  I just painted each letter onto burlap.  I used the storybook cartridge on my Cricut. 
Total cost: less than $5.  With left over material


Next, the Styrofoam balls.  I actually got these at the Dollar Tree. The candy.  Dollar Tree.  One is covered in peppermint puffs (this was out at Christmas), one in red hots, and the other in candy conversation hearts.  Just hot glue those suckers on! Total cost $10 {For glue, candy and Styrofoam.  Plus some extra candy for more projects!}


I just copied the statue.  :) I got the letters at Hobby Lobby for 99 cents each.  Painted them red.  Used dabs of hot glue to stick them together.  Voila.  Total cost: $4

I grabbed a frame.  Stuck in some scrapbook paper.  Easy.  Total cost: FREE!

I just stuck some candles on the ends (I got at Hobby Lobby for 80% off - left over from Christmas.  But the first is a jar candle with layers of red and pink.  Looked Valentine's to me.  Paid $4.  The other is a pillar candle rolled in red glitter.  Nothing says Valentine's like glitter!  Paid $3.)

Come by tomorrow for the rest of my super easy cheap Valentine's Day stuff!

Don't forget to enter the CSN giveaway here!
And I'm giving away fabric here!

Linked up here!

Tuesday, January 4, 2011

Valentines...Tra la la la la.....

One of my goals for 2011 was to open an Etsy shop. Check me out here!  {I know.  How late am I to jump on that band wagon?!}  So I've been working like a mad woman on coming up with some really cool Valentine's Day Stuff to put in that little shop of mine.  The first thing I put in there were these hand towels:


Cute right?  And guess what?  The first set I put in there...sold in an hour!  I was like woahhhh...Wouldn't it be cool if all stuff sold like that!? LoL.   {see the listing here!}

This is a little bag I thought would be perfect for little girls.  It's the perfect size to collect Valentines (8 1/2 inches long and sits at 6 inches tall).  {See the details here}


I also made this shirt.  Because boys need Valentine's Day stuff too.


 Get it Nothing Bot Love?  A robot?  bwhahaha.  I thought I was clever.  And I even googled it.  And came up with nothing.  I'm sure I'm not the first.  But in mind I'll just think I am. :) Oh and please ignore my child's wild man hair.  That needs to be cut.  Like yesterday.  {shirt listing is here}

I've got a whole list of boys Valentine's phrases that would make cool shirts.  But how many shirts does my son really need for Valentine's Day? {Because I have to make one for him to model right?}  Or do I go ahead and make them?  Any shop owners out there that make clothes?  What sizes sell the best for you?


Monday, November 29, 2010

Tutorial Tuesday


Here is what I posted today over at This & That Creative.  I just love it over there!

Hey friends!  I hope you all are having a fantastic Tuesday.  I think I have something here that will make you all very happy.  I've got something here that makes me happy.  Esp. with my whole candy Christmas theme I've got going on this year.  Well I was going to replace my decorative balls with candy balls but they turned out bigger than I thought.  No sweat.  I'll just turn it into this instead...


Fabulous huh?

Super easy.  And cheap.  This is how.

You need:

Styrofoam ball - I was surprised at how much they were $5 for 2 at Joann's -- bring a 40% of f coupon -- they also take Hobby Lobby coupons.
Candy - I went to the dollar store and got these hard candies.  I also made one in peppermints and gumdrops.  {I ran out of candy so I have to make a trip and then I will post them all together. Ahhh can't wait!}
Hot glue/glue gun
Pot
Paint
Playdoh x 2 {I'm sure you could use something else ... something that was made for crafts but I used what I had at the house and when I thought about dumping plaster in I thought waaaaay to heavy}
Wooden spoon {again -- a wooden dowel - a thick one - would work.  Got the spoons - a 3 pack of different lengths - at the dollar store as well...and they work}

Alright.
Step 1.  Glue the candy on the ball.

Step 2. Before you have it all covered make your hole.  Obviously don't go all the way through but you want it pretty deep to make sure it is stable.

Step 3. Paint your pot and spoon.

Step 4. Insert spoon into play doh.  {Except, have spoon painted and I used 1 1/2 things of Playdoh just to make sure it was stable.}  Put in sun and let it dry out.

Step 5.  Cut a felt circle.

Step 6.  Add some tissues for poofiness.  Cover with felt.

Step 7.  Put ball of candy on top.  Ta Da!

Repeat with more candy.  You have a candy forest.

Another thing I like about this besides that it is cheap?  {Total cost: $5 each}

You can totally bring these bad boys back out for Valentine's Day.  Candy hearts?  Ohhh yeah.

See you next Tuesday!!

Amanda

P.S. As soon as I get more candy and it all set up inside I'll have to update w/ some new pictures! :)

Tis the season --- I heart Christmas. {That's a lot of love people}

Like I said go check out This & That Creative!
I also linked up!

$1 Christmas Card holder

This is very easy.  Very cheap.  And pretty quick.

You need:
felt in assorted colors
clothes pins
string/ribbon/rope
hot glue/glue gun

First either draw or google an image of a Christmas tree light.  Then trace it onto grey felt.

Cut out.

Then trace the 'bulb' onto the colored felt.  Cut.

Either glue or sew the colored bulb onto the grey light shape.  I sewed mine but glue would work too.

Cut thin grey lines.  Glue/sew onto the bulb.

Hot glue a clothes pin on the back. 
Glue the ribbon/rope/string to the clothes pins.

That's it.


Hang your cards.  The lights are hung.  The cards are here.  Time to spread Christmas cheer.

HAHAHAHA I just made that up. :)


Made it Monday - Card Holder $1 Style!

Hello friends!  It's nice to be back ... and back on schedule.  I hate being off schedule.  Today I am sharing my entry into Fireflies & Jellybean's Iron Crafter.  One of them...If I have time there is something else I want to do too. 

I saw this in the Lillian Vernon catalog.
While it's not really expensive I knew that I could make it for way less. (It retails for $19.99)  The only difference between the two is Lillian's is 'leatherette' and mine is felt.  Oh and mine costs about $1 to make.  

 I haven't officially decided where to hang this so just to get a picture I draped it over my {beautiful} kitchen cabinets.  Bear with me. 
And because I haven't received any Christmas cards yet (if it's because I'm lame don't tell me...just let me think it's because it's early) :) I had to use some note cards I made for my MIL.

The cord/rope I got at the dollar store along with the clothes pins.  It's hard to tell in the pictures but the cord is kind of candy cane like. 

You know for a quick and super cheap craft -- I like it.

I esp. love the little lines on the bulb base.  {Here is my technical description...get ready for it....} You know the little grooves on the part that screws into the light?  {Somebody please help!} The grey part.  How about that?
 
And this is one of my favorite cards in her note card pack.  She is very active in her church and they do Secret Sisters alot so I thought note cards to tuck inside would be perfect.

This was super easy, come back for step by step how to's!