



Showing posts with label Gabes Gifts. Show all posts

Tuesday, May 24, 2011

Car Seat Cover Tutorial

Here's Heidi!  I just love her blog Trying it Out!  And she's so sweet!  Make sure to stop by and tell her hello!!

I am Heidi and I blog over at trying it out. I used to be a junior high math teacher, until I had my first daughter, who is now four. I also have a 22 month old daughter and a pretty great husband (most the time anyway :) ). I love to create, but I am not creative. Fortunately I have the rest of the blogging world to inspire me, and I often use their help to make something. I am too independent to ask someone to teach me, so I learn by trial and error, often more error. I just like having a place to keep track of all the things I make, and my progression. This is my first time being featured, and I am pretty excited about it, Thanks Amanda for giving me a chance, and for always helping me find more inspiration


Car Seat Cover/Nursing Cover Tutorial
Car Seat cover
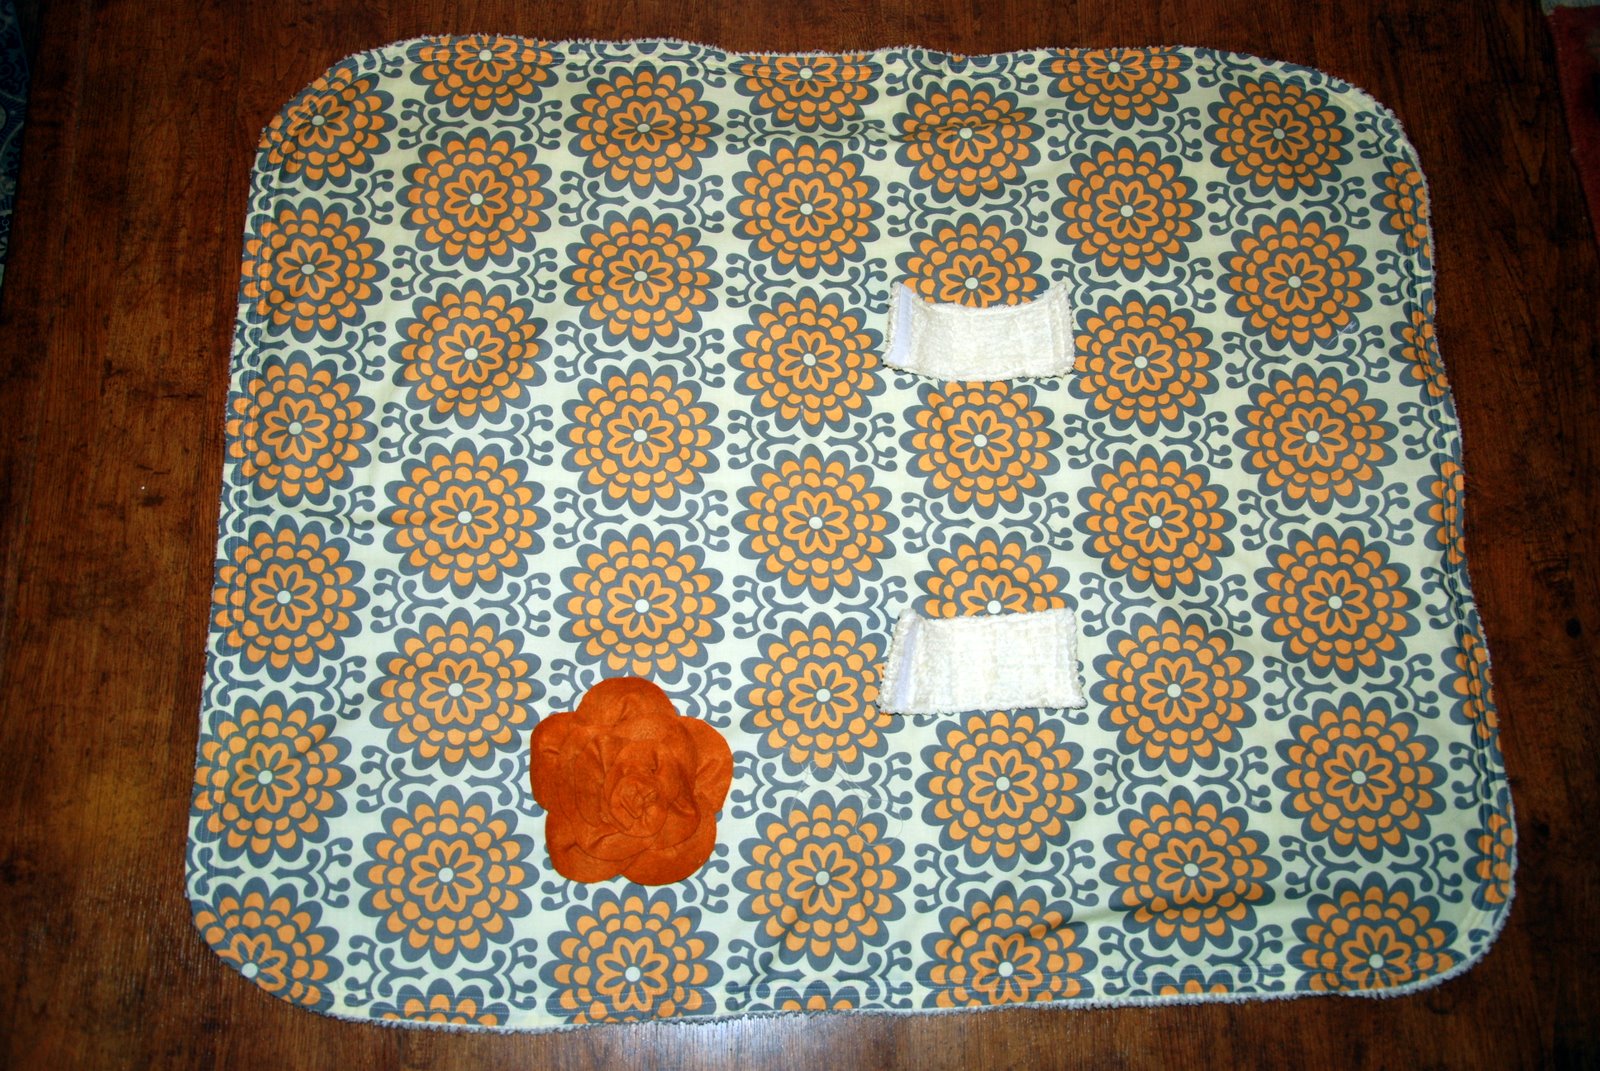
add a strap
Nursing Cover

You will need: one yard of front fabric (I used cotton quilting fabric)
one yard of back fabric (I used Chenille)
scraps of wool felt-optional (for flower)
Velcro (the sew on kind, not the sticky kind, it will gunk up your machine)
basic sewing tools (thread, scissors, pins, etc)

Cut both pieces about 35 inches wide, give or take (forgive me, I decided to do the tutorial after finishing, so all my pictures are of the finished product, not during the process)


and about 43 inches long

using a bowl, plate, or something round, round the edges of your fabric
sew the flower on.  I used leftover felt from this and followed to same general steps, just making it smaller


then sew the two pieces together, wrong sides together, leaving a space for turning
turn right sides out and top stitch (I did three rounds of top stitch, because I liked the look of it.  You could do one or two)


now make the straps for attaching to the car seat

I sewed to rectangles of chenille together measuring about 3.5" by 7.5".  I sewed them right sides together, then turned them right side out and top stitched.  I repeated for the second strap.


Then I sewed Velcro on, so it could wrap around the car seat handle.  Make sure you place the Velcro on opposite sides, so it can wrap flat

it will Velcro closed like this

Then I sewed the straps on (I did two seams down the center to attach each strap)

if you enlarge this picture, you will see the straps are about 13" down from the top
and about 21 inches up from the bottom (yours do not have to be exact)

place them about 10" in on either side

and about 8 inches apart

now make the strap, for the nursing cover


I sewed two rectangles right sides together, measuring 25.5"x3.5" and turned them right sides out.  Then I top stitched around

now you are done

if you feel inclined, embellish a cute burp cloth to go with it (I just used scrap fabric, some leftover lace hem tape, and some lace.  The lace came on a spool and so it already had a tendency to roll.  I just stared a circle on the outside, and rolled it in to the center)
Did you know that  My Vinyl Designer offers FREE downloads of some of their designs?  Go check them out!!
My Vinyl Designer Modern Art for the Home

Friday, April 22, 2011

Flower Rag Quilt Blanket

I am so excited to be here today! I am the author of A Vision to Remember. I also have my own etsy shop, where I sell many of my creations. I am a stay at home mom of 2 awesome girls and one dog. They are my inspiration for sure. Everything that I have made has been for them in some way.

Here are a couple of things that I have made over at my blog:

I love making rag quilts. I sell many in my etsy shop, but this pattern is available for download on my blog here.


This was a fun pleated headband that I made for myself (one of the few times that I craft for myself, if you know what I mean :)


I also made this fun Ribbon skirt for my daughter (Part 1, Part 2)

I also have many other tutorials on my blog. Make sure to stop by and check them out.


I also have my own Etsy shop. There I sell rag quilts, car seat tents, and lots of patterns. Some of the patterns I sell are rag quilts, belly band, and fabric flowers.


Thanks again for swapping blogs with me and make sure to stop by tomorrow and link up to Check ME Out Saturday Link Party Have a great day!

Monday, February 14, 2011

Blanket Tutorial

So this week I wanted to do a blanket! I made it about a week ago.  And I went to upload my pictures and <duh>.  I had to erase them when I put my memory card in....

<cue cheesy game show music>

my BRAND..... NEW.....CAMERA. {Crowd cheers.  Or at least I do.}

Yup.  Happy Valentine's Day!  Andy got me a Nikon D3100.  And I love it.

So it's a good thing it's as basic as basic gets.  Maybe just something you wouldn't have thought of to do.

Is that a table cloth?  Why yes it is.

And all you do is take a table cloth (I got this one at Target for about $4 on clearance.  The thicker ones work best!)

Lay it out right side up.  Take a piece of fabric (I used 1 yard of fleece...I stocked up when Joann's had it for $3 a yard!!) pin it together.  Sew leaving a small opening.  Trim your corners.  Flip and sew it up.

Sound boring?  No way!  This is perfect for storing in your car.  Put the tablecloth side down when you take the kids to the park.  Your blanket won't get all muddy.

Do your kids play sports?  Well, it always seems to drizzle when it's game day.  Put the fleece side down to keep you warm and when the rain hits the tablecloth side it keeps you dry!

Kids having a sleepover and want to eat in the living room in front of the TV?  Put this down tablecloth side up!  No juice spilling on your carpet.  Wipes right off. 

MACHINE WASHABLE (make sure you check your tablecloth package to double check!)

I love these blankets!

Remember to check out My Vinyl Designer for all the latest in Vinyl! :)

Monday, February 7, 2011

Guest Post : Dressing Heidi Sage

I can't believe we are starting month 2 of blanket tutorials!! WOW! The gals from Dressing Heidi Sage are just adorable.  It's a whole family event - - which I love.  And wait til you see their little blanket.  I love the pocket.  Well...can I even call it a pocket?  It's the cutest pocket ever.  Read on!  You'll see!  Thanks gals for sharing!! :)

Hey, this is Courtney from Dressing Heidi Sage.  We're a blog of all things cute for kids.  With my kids as inspiration, Deborah (my mom), Chelsea (my sister) and I, find ourselves busy crafting for and with kids...while all being hundreds of miles apart.  This particular tutorial is for a blanket Deborah made for Heidi Sage.  Not only is it adorable and cozy, it's also a blanket any skill level can make!  We hope you find the tutorial easy to follow and we would love to see you make one for Gabe's Gift.  As you read through the tutorial, remember this could very easily be changed into a blanket for a boy or even gender neutral.  It's all in the details.  So without further ado, I'll hand it over to Deborah...


Heidi Sage has already started to pre-school, and her school requires a blanket for nap time. I received a phone call from her mother this summer with an order for one blanket with Heidi Sage's name, dimensions of the blanket needed to be 3 foot by 4 foot, and it should be double sided for warmth....oh, and she wanted it red to match her school bag and bedroom. (Her mother is only slightly particular!)


So, I started thinking of different ways to make Heidi Sage's blanket. I decided it would need some flowers to make sure it was girly and later in the project I decided to add a purse and high heel to make sure it was REALLY girly. The purse was also to serve a purpose, but I'll get to that in a bit.


I used fleece for the blanket and also for the appliques. Little ones tend to love how soft and cozy fleece is. I first made some simple paper flower patterns and cut my flowers from different colors of fleece.


All the appliques were sewed on by hand. I used embroidery thread to sew on my appliques. I used the six strand thread and divided it into three strands. I used a blanket stitch for attaching each of the appliques. I sewed on the flower centers first before attaching the flowers to the blanket.  Click here for a quick video on how to do a blanket stitch!


I monogrammed Heidi Sage's name in one corner and added some flowers around her name. If you don't have a monogramming machine and you want it personalized, you can always just leave space and then take it to a local sewing store, boutique, or other shop that has a machine. Make sure to shop around. You can find people who will do it out of their house for as cheap as $5/piece...and others who are really proud of their ability to push buttons and center things!


On the opposite corner I decided to add THE purse. Our Heidi Sage doesn't go more than five minutes without a pacie in her mouth, and she sure never takes a nap without one. So, in order to make sure she always had one for nap time, the blanket was made to hold extra pacies. And I added a shoe just for fun. A girl can never have to many shoes in our family! I found a simple purse pattern online and attached the flap onto the purse so it could open and close.


After all the appliques were finished I added the back piece of fabric and used the sewing machine to sew the two pieces together.


Courtney has reported the blanket gets softer and cozier with every washing!
NOTE: This could also easily be for a boy just by finding some simple dinosaur or truck patterns. The possibilities are many....the cuteness is endless!


Stay warm!
--
The Girls at Dressing Heidi Sage
dressingheidisage.blogspot.com

Monday, January 24, 2011

Guest Post: Tea Rose Home and her Swaddle Blanket

I just love Tea Rose Home.  Sachiko is seriously talented!  And I was so excited she agreed to post today! :) You have to check out her blog.  Everything she makes turns out amazing!!

Hi everyone! I am Sachiko from Tea Rose Home. On my blog I share sewing, quilting, repurposing ideas (and don't miss the free tutorials!) and sometimes yummy recipes too. I host link parties every Wednesday. If you love to see what people are working on and want to be inspired, come visit me and join the fun!

Amanda asked me to be a guest blogger for her blog, and I am totally honored to be here. Thank you for inviting me Amanda!

Today, I am sharing a tutorial for a self binding method to make swaddle blankets. I hope you will enjoy it!

I have made so many blankets in the past. I think this is one of the most easiest ways to make baby blankets. It might be a little confusing at first, folding the corner, but once you get used to it, you can finish a blanket in no time!


{You will need}

1- 43" X 43" flannel (It was 44" wide flannel, I cut off the sides to get rid of the writings and thickness. This fabric will be the outer border.)

1- 36" X 36" flannel

Matching thread

{How to}

1. Mark the middle for all sides for both fabrics. Lay them together with right sides together. First, pin the middle of the four sides. Then pin the edges starting in the middle make your way outwards to the corners.


2. Start sewing using 1/4" seam allowance. Remember to leave a 5" opening for you to turn the fabric inside out later.


3. Fold the corner. Draw a line to help you to know where to sew. Use the picture as a guide.


4. Cut the excess off. Repeat the process for the other corners.


5. Press the seam towards the outside with an iron.


6. Turn the fabric inside out. Iron. Pin the opening and top stitch all around the blanket.


7. Ta-da. That's it!


Wasn't that fun? I have been going through my stash and made some in the past few weeks. They always come in handy for baby showers and such. I hope you enjoyed the tutorial!